Smart water heater using Arduino DIY Project
Smart water heater using Arduino

Code
#include <OneWire.h>#include <DallasTemperature.h>#include <LiquidCrystal.h>#include<EEPROM.h>LiquidCrystal lcd(7, 6, 5, 4, 3, 2); //LED displayint add_chk = 0;int check_val = 10; //temp sensorint c_temp = 0;int c_temp_add = 1;int f_temp = 0;int f_temp_add = 2;int set = A3, dec = A2, inc = A1, stsp = A0; //buttonsint numberOfDevices;int relay = 8; //Relayint buzzer = 9;//Buzzerint val_tol = 0;bool exit_stsp = false;bool exit_set = false;bool buz = true;bool re_heat = false;#define ONE_WIRE_BUS 10 // Pin no#define TEMPERATURE_PRECISION 12 // 12-bit resolutionOneWire oneWire(ONE_WIRE_BUS);DallasTemperature sensors(&oneWire);DeviceAddress tempDeviceAddress;//------- Temperature tolerance -------//const int tol = 1; // in degree Celsius//-----------------------------------//void setup(void){lcd.begin(16, 2);sensors.begin();pinMode(stsp, INPUT_PULLUP);pinMode(inc, INPUT_PULLUP);pinMode(dec, INPUT_PULLUP);pinMode(set, INPUT_PULLUP);pinMode(relay, OUTPUT);pinMode(buzzer, OUTPUT);digitalWrite(relay, LOW);digitalWrite(buzzer, LOW);lcd.clear();lcd.setCursor(0, 0);lcd.print(" Water Heater");lcd.setCursor(0, 1);lcd.print(" Controller");numberOfDevices = sensors.getDeviceCount();if (EEPROM.read(add_chk) != check_val){EEPROM.write(add_chk, check_val);EEPROM.write(c_temp_add, 50);f_temp = f_conv(50);EEPROM.write(f_temp_add, f_temp);c_temp = EEPROM.read(c_temp_add);f_temp = EEPROM.read(f_temp_add);}else{c_temp = EEPROM.read(c_temp_add);f_temp = EEPROM.read(f_temp_add);}delay(1500);}void loop(void){lcd.setCursor(0, 0);lcd.print("PRESS START/SET");lcd.setCursor(0, 1);lcd.print("TEMP: ");lcd.print(EEPROM.read(c_temp_add));lcd.print("C/");lcd.print(EEPROM.read(f_temp_add));lcd.print("F");if (digitalRead(set) == LOW && exit_set == false){exit_set = true;c_temp = EEPROM.read(c_temp_add);f_temp = EEPROM.read(f_temp_add);while (exit_set){if (digitalRead(inc) == LOW){c_temp += 1;if (c_temp > 110) c_temp = 0;f_temp = f_conv(c_temp);delay(50);}if (digitalRead(dec) == LOW){c_temp -= 1;if (c_temp < 0) c_temp = 110;f_temp = f_conv(c_temp);delay(50);}lcd.clear();lcd.setCursor(0, 0);lcd.print("SET TEMPERATURE:");lcd.setCursor(0, 1);lcd.print(" ");lcd.print(c_temp);lcd.print("C/");lcd.print(f_temp);lcd.print("F");delay(150);if (digitalRead(set) == LOW){delay(500);if (digitalRead(set) == LOW){exit_set = false;if (EEPROM.read(c_temp_add) == c_temp){lcd.clear();lcd.print("VALUE UNCHANGED!");delay(1500);}else{EEPROM.write(c_temp_add, c_temp);EEPROM.write(f_temp_add, f_temp);lcd.clear();lcd.print(" VALUE SAVED!");lcd.setCursor(0, 1);lcd.print("****************");delay(1500);lcd.clear();}}}}}if (digitalRead(stsp) == LOW && exit_stsp == false){exit_stsp = true;lcd.clear();lcd.setCursor(0, 0);lcd.print("SET: ");lcd.print(EEPROM.read(c_temp_add));lcd.print("C/");lcd.print(EEPROM.read(f_temp_add));lcd.print("F");buzz();digitalWrite(relay, HIGH);while (exit_stsp){sensors.requestTemperatures();for (int i = 0; i < numberOfDevices; i++){if (sensors.getAddress(tempDeviceAddress, i)){printTemperature(tempDeviceAddress);}}lcd.setCursor(0, 1);lcd.print("WATER: ");lcd.print(c_temp);lcd.print("C/");lcd.print(f_temp);if (f_temp < 100){lcd.print("F ");}else{lcd.print("F");}if (c_temp >= EEPROM.read(c_temp_add) && buz == true){delay(5000);if (c_temp >= EEPROM.read(c_temp_add)){digitalWrite(relay, LOW);buz = false;re_heat = true;for (int j = 0; j < 15; j++){digitalWrite(buzzer, HIGH);delay(100);digitalWrite(buzzer, LOW);delay(100);}}}val_tol = EEPROM.read(c_temp_add) - tol;if (c_temp <= val_tol && re_heat == true){buz = true;re_heat = false;digitalWrite(relay, HIGH);}if (digitalRead(stsp) == LOW && exit_stsp == true){delay(1500);if (digitalRead(stsp) == LOW){digitalWrite(relay, LOW);exit_stsp = false;lcd.clear();lcd.print("PROCESS STOPPED!");lcd.setCursor(0, 1);lcd.print("****************");buzz();delay(500);lcd.clear();break;}}}}}int f_conv(int x){int temp;temp = x * 9;temp = temp / 5;temp = temp + 32;return temp;}void printTemperature(DeviceAddress deviceAddress){c_temp = sensors.getTempC(deviceAddress);f_temp = f_conv(c_temp);}void buzz(void){digitalWrite(buzzer, HIGH);delay(1000);digitalWrite(buzzer, LOW);}Remember: This is a basic example, and you might need to modify the code based on your specific components and desired functionalities.
Building and Testing:
- Assemble the circuit on a breadboard according to the diagram.
- Upload the code to your Arduino Nano.
- Place the temperature sensor in the water tank and adjust its position for accurate readings.
- Plug in the mini water heater and turn on the system.
- Use the push button and potentiometer to set your desired temperature.
- The water heater should turn on and off automatically to maintain the desired temperature.
Buttons functions:
S1: Start / long press to stop the heater.S2: Increment a digit (INC).
S3: Decrement a digit (DEC).
S4: To set and save the temperature value.
- Turn ON the circuit with the completed hardware set-up, you will see this screen:

The above is the home screen it shows the user set temperature. You may either press start button to get your water to 50C/122F or you may press SET button (S4) to enter a new temperature value.
2. To enter a new temperature, press SET button (S4) and you’ll see the screen below. Press INC or DEC buttons to bring your desire temperature value on the screen.
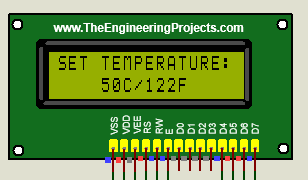
3. Long press SET button to save the value and “values saved!” message will appear and it will get stored to EEPROM of Arduino and the screen will return to home.

4. Now press start button (S1), the relay will turn on with a beep to indicate that the process has started and you’ll see the below screen:
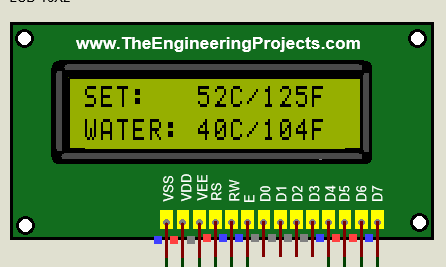
The “SET” on the screen is the value that you have just entered and “water” is the present temperature of the water where the temperature sensor is dipped in.
5. Once the water reaches the “SET” temperature the relay turns OFF and buzzer beeps for few seconds to notify that water is ready for use and you may turn off the heater by long pressing the start/stop button (S1):

- 6. Or to maintain the set temperature of the water, just leave the circuit ON for as long as you want, your set temperature will be maintained. Turn off the buzzer so that it won’t beep ever time the relay turns off.
- 7. When you turn ON the circuit the last set value will be retrieved from EEPROM. You may either press start button (S1) to heat the water or press SET button (S4) to enter a new temperature value.
Additional Features:
- You can add a real-time clock module to schedule the water heater to automatically heat up at specific times.
- Integrate the project with a mobile app for remote control and monitoring.
- Implement voice control using speech recognition libraries.
Conclusion:
Building your own smart water heater with Arduino is a rewarding project that combines electronics, programming, and practicality. It's a great way to learn new skills, save energy, and enjoy the convenience of having hot water on demand. So grab your tools, get creative, and start building your own smart water heater today!


Comments
Post a Comment